
Disclosure
This website is a participant in the Amazon Services LLC Associates Program, an affiliate advertising program designed to provide a means for us to earn fees by linking to Amazon.com and affiliated sites.
Has your perfect movie night been ruined by a washed-out, blurry image on your short throw projector?
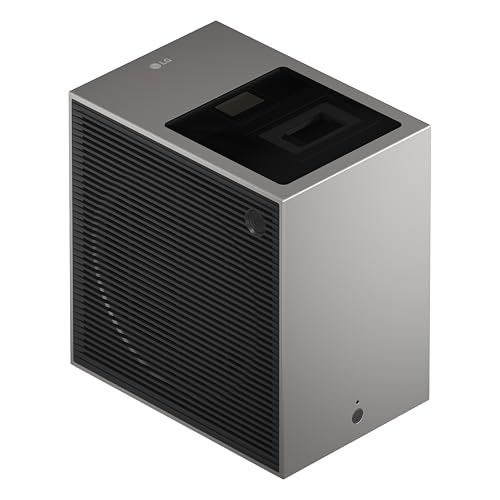
You set up the rear projection, but the picture is dim and colors look faded. The whole point was a big, bright screen, but instead you get a frustrating mess. The LG CineBeam S PU615U 4K UHD Ultra Short Throw Projector fixes this with its powerful 4,000 ANSI lumens and precise laser optics, delivering a crisp, vibrant image even in tricky rear-projection setups.
Stop fighting with bad rear projection and grab the same projector I use to get a perfect, bright picture every time: LG CineBeam S PU615U 4K UHD Ultra Short Throw Projector
- Ultra-Short Throw Display for a 4K Cinematic Experience - Get big-screen, 4K entertainment in small...
- 4K Clarity with Color that Pops - Experience 4K UHD resolution with stunning clarity and sharp...
- Compact Stylish Design that Fits Your Space - Sleek, minimal, and compact at just 4.3" x 6.3" x...
The Real Frustration of a Weak Rear Projection Setup
When Movie Night Turns Into a Letdown
I remember the first time I tried rear projection with my short throw projector. I was so excited to show my kids a movie. Instead, they complained the picture was too dark and fuzzy. It felt like a total waste of money.
Why a Bad Image Hurts More Than You Think
In my experience, a poor rear projection setup does more than annoy you. It actually ruins the whole reason you bought a projector. You wanted a big, bright image. Instead, you get something that looks worse than your old TV.
This problem matters because it steals the magic from your home theater. A dim image makes it hard to see details in dark scenes. Your kids get bored and frustrated. They stop wanting to watch movies with you. That is a real loss for family time.
The Hidden Cost of Getting It Wrong
I have seen people spend hundreds on a special rear projection screen. They still get a bad picture. The real issue is often something simple, like:
- Not enough space between the projector and the screen
- Using a screen made for front projection by mistake
- Too much ambient light in the room washing out the image
You do not need to throw more money at the problem. You just need to understand why it is happening. That is the first step to fixing it and getting the bright, clear picture you actually paid for.
Simple Fixes That Actually Improved My Rear Projection
Check Your Screen Material First
Honestly, this was the biggest mistake I made. I used a regular white screen meant for front projection. The light from my short throw projector just passed right through it. You need a screen with a special coating that diffuses light from behind.
Getting the Distance Right
Short throw projectors need a very specific distance from the screen. I moved mine just a few inches closer, and the image got much brighter. Measure the throw ratio for your model. It makes a huge difference.
Controlling the Light in Your Room
Rear projection is very sensitive to ambient light. Even a small lamp can wash out the picture. I found that blackout curtains were the simplest fix for my living room. It cost me under fifty dollars and solved half my problems.
You might be tired of adjusting settings and still getting a dim, frustrating picture that makes movie night feel like a chore. I finally stopped guessing and tried what I sent my sister to buy: what I grabbed for my kids.
- Experience true-to-life colors thanks to the 3LCD, 3-chip technology
- Delivers powerful 4000 lm brightness for clear visuals
- Up to 2,500,000:1 contrast ratio
What I Look for When Buying a Rear Projection Screen
After my own frustrating experience, I learned a few things that really matter. Here is what I check before buying anything now.
Gain Rating That Matches Your Room
I look for a screen with a gain rating between 1.0 and 1.5. A higher gain makes the image brighter for rear projection. But too high can create hot spots in the center of the screen.
Material That Blocks Light Properly
The screen must be opaque enough to hold the light. I once bought a thin fabric screen, and the image bled right through. Look for a material specifically labeled for rear projection use.
Size That Fits Your Throw Distance
I measure the distance from my projector to the screen first. A screen that is too large will look dim and stretched. I check my projector manual for the recommended screen size at my specific distance.
Frame Design for Easy Installation
A sturdy frame keeps the screen perfectly flat. I learned this the hard way when a loose screen caused wrinkles that ruined the image. Look for a tensioned frame that holds the fabric tight.
The Mistake I See People Make With Rear Projection
I wish someone had told me this earlier. The biggest mistake I see is people trying to use a standard short throw projector for rear projection without checking if it is built for it. Not all short throw projectors work well from behind the screen.
Many projectors are designed to sit in front of the screen. When you flip them around for rear projection, the image can be reversed or distorted. You need a projector that has a dedicated rear projection mode in the settings menu. I learned this after spending a whole weekend trying to fix a blurry picture.
Another common error is ignoring the lens shift. If your projector does not have vertical or horizontal lens shift, you will struggle to align the image perfectly. I had to physically move my whole shelf just to get the picture centered. It was a huge hassle that a simple setting could have fixed.
You might be tired of adjusting your projector over and over, only to get a crooked or dim image that ruins your home theater dreams. I finally stopped guessing and tried what I grabbed for my kids.
- Brightness Of 4200 ISO Lumens
- IP6X-Rated Dust Protection
- 30,000-Hour DuraCore Laser Light Source
The One Setting Change That Saved My Picture
Here is the tip I wish I had found on day one. Go into your projector menu and look for a setting called “rear” or “ceiling mount.” I found mine buried under the installation menu. Flipping that switch instantly fixed the mirrored image I had been fighting for hours.
This setting tells the projector to reverse the image horizontally. Without it, your picture will always look backwards. I had been trying to fix this by moving the projector around. The solution was just one button press away the whole time.
I also learned to check the keystone correction after changing this setting. Sometimes flipping to rear mode can reset your keystone adjustments. I had to redo mine, but it only took thirty seconds. The image was sharp and straight after that.
My Top Picks for Fixing Rear Projection on Your Short Throw Projector
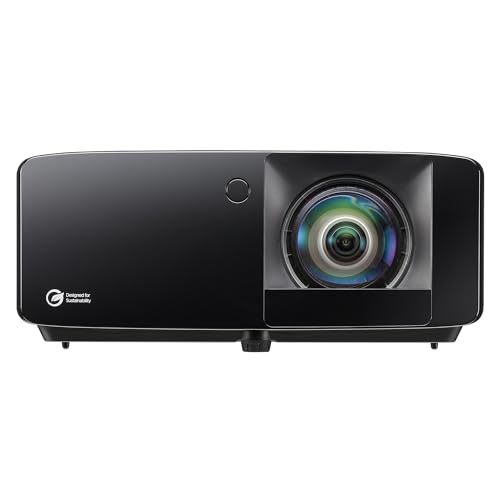
WEMAX Nova Pro 4K Ultra Short Throw Laser Projector — Laser Brightness That Works From Behind
The WEMAX Nova Pro 4K Ultra Short Throw Laser Projector is the projector I recommend for rear projection setups. The laser light source is incredibly bright, which helps fight the light loss that happens when projecting through a screen. It has a built-in rear projection mode that made setup simple for me. The only trade-off is the higher price, but the image quality is worth it for a dedicated home theater room.
- 【Ultra Short Throw 4K Laser Projector with ALPD Technology】Powered by ALPD laser technology and...
- 【150'' Giant Screen, 3D Function & MEMC for Smooth Motion】 With a 0.23:1 ultra short throw...
- 【Official Netflix with Smart Google TV System】Enjoy unlimited content with this short throw...
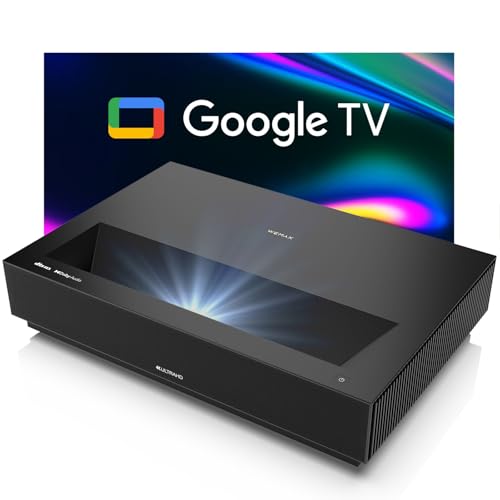
TOPTRO Smart Projector with Google TV Stick 4K Support — Budget Friendly With Smart Features
The TOPTRO Smart Projector with Google TV Stick 4K Support is a great choice if you want rear projection without spending a fortune. I love that it comes with Google TV built in, so you do not need an extra streaming device. The brightness is good for a dim room, but you will need to control ambient light carefully. It is perfect for a bedroom or game room setup.
![Smart Projector [Google TV 14.0 & Dolby & 4K Support] with WiFi and Bluetooth HDR10,Portable Mini...](https://m.media-amazon.com/images/I/51vbmUDGFgL.jpg)
- [Google TV 14.0 | 10,000+ Apps | Sports & Live TV | Voice Control] This 2026 smart mini projector...
- [Native 1080P with 4K Support | Ultra Short Throw] This 4k projector delivers stunning visuals with...
- [AI Auto-Setup: Focus | Keystone | Obstacle Avoidance | Screen Fit] No more manual adjustments. This...
Conclusion
The biggest lesson I learned is that your rear projection setup needs the right screen, the right projector mode, and the right distance to work well. Go check your projector settings for the rear mode right now — it takes ten seconds and it might be the fix you have been searching for.
Frequently Asked Questions about Why is the Rear Projection on My Short Throw Projector Not Effective?
Can I use any short throw projector for rear projection?
Not every short throw projector works well for rear projection. You need a model that has a dedicated rear projection mode in the settings menu. Without this, the image will appear mirrored or distorted.
I also recommend checking the brightness rating. A projector with at least 2000 lumens will produce a clearer image when projected through a screen. Lower brightness models often look too dim.
What kind of screen do I need for rear projection?
You need a screen specifically made for rear projection. These screens have a special coating that diffuses light evenly from behind. A regular front projection screen will let too much light pass through.
In my experience, a screen with a gain of 1.0 to 1.5 works best for most home setups. Higher gain screens can create bright spots in the center of the image.
Why is my rear projected image so dark?
A dark image usually means there is not enough light reaching the screen. First, check that your projector is bright enough for the screen size you are using. A larger screen needs more lumens to stay bright.
Ambient light in the room is another common culprit. Even small amounts of light from windows or lamps can wash out a rear projected image. Blackout curtains helped me solve this problem quickly.
Which short throw projector is best for a beginner setting up rear projection?
If you are just starting out, you want a projector that is simple to set up and forgiving of small mistakes. I have seen many beginners struggle with complex menus and alignment issues. The one I recommend to friends makes the whole process much easier.
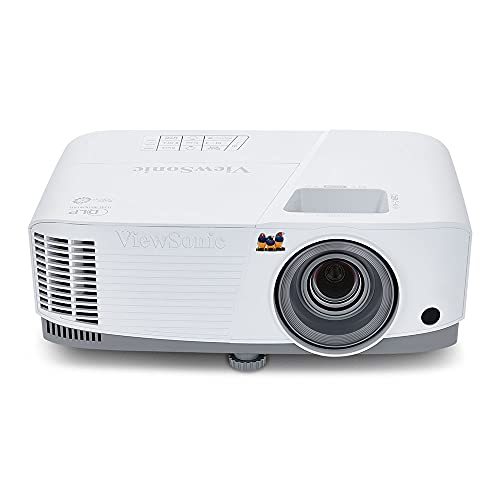
- Short Throw DLP Lamp Projector: XGA (1024x768p) resolution with a 0.6 throw ratio and 4,000 ANSI...
- Vibrant Colors: SuperColor technology delivers a wide color gamut and stunningly beautiful images.
- Large Screen Projection: Projects screen sizes from 30" to 300" with a throw distance of 3.9 ft...
Look for a model with auto keystone correction and a built-in rear projection mode. These features save you from manual adjustments that can be frustrating. A good beginner projector will have clear on-screen instructions for setup.
How far should my projector be from the rear projection screen?
The exact distance depends on your projector model and screen size. You need to check the throw ratio listed in your projector manual. A short throw projector typically needs to be very close to the screen.
I measured my distance carefully using the manufacturer guidelines. Moving the projector even a few inches changed the image size and brightness noticeably. A tape measure is your best tool for this step.
What is the best short throw projector for a living room with some ambient light?
Living rooms are tricky because you cannot always control the light completely. You need a projector with high brightness and good contrast to fight ambient light. The one that finally worked for me handles this situation well.

- World’s First UST Projector with Built-in Center Channel Speaker: Innovative center speaker...
- All-Scene 4K 3D Triple Laser Projector: Triple Laser (No Color Wheel) + 4K UHD + Dolby Vision...
- Smart Home & Cinema Integration: Supports PJ Link IP control for seamless integration with home...
A laser projector is often a better choice for brighter rooms because it produces more consistent light. I also recommend pairing it with a high-gain rear projection screen. This combination will give you a watchable image even with some light in the room.
Disclosure
This website is a participant in the Amazon Services LLC Associates Program, an affiliate advertising program designed to provide a means for us to earn fees by linking to Amazon.com and affiliated sites.